February 3, 2025 | 8 min read | By: Len Smith
I am ashamed to admit that my workbench is horrid. I built it when I first started woodworking and without educating myself about what I might actually need. Okay, it’s not all that bad, but its primary weakness is work-holding. Occasionally, I have thought about building a traditional cabinetmaker’s workbench, but was put off at the cost.
My primary need was vertical work holding and a way to secure wider pieces. I considered adding a twin-screw vise to my current workbench, but never took any action. Late last fall, I noticed a post from maker in my Instagram feed who was using a Moxon vise. Eureka!! After some research, I oped for a design that married the traditional Moxon vise style with a small workbench-like extension that offered both work holding and a flat surface to meet other needs. I borrowed elements of this design from a number of sources.
For me, the primary benefit of this design is that my projects tend to be smaller these days (e.g., boxes, cutting boards,etc.), so this is perfect for these types of activities. Another benefit is that this vise-bench raises the work a bit higher, making it easier on my back and eyes.
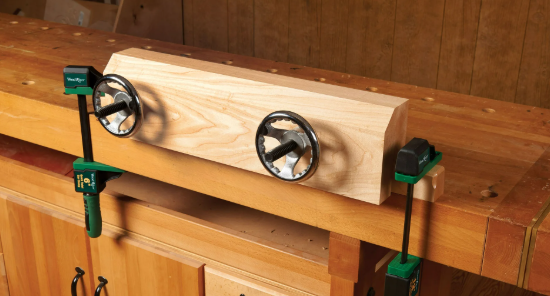
A Moxon consists of two basic components, a pair of threaded rods with an accompanying pair of adjustment wheels and the vise’s front and rear faces. This style vise is named after Joseph Moxon, who first described it in his 17th century book Mechanick Exercises.
The vice’s jaws are typically made out of a strong, stable and durable species of wood, such as maple. The vise’s use of a twin-screw approach allows provides secure and even clamping pressure. Often, the front face of the vise includes elongated screw holes, which allows the front face to rack to accommodate a tapered work piece. At least one of the vise’s jaw faces are lined with a material such as leather, cork or similar material.
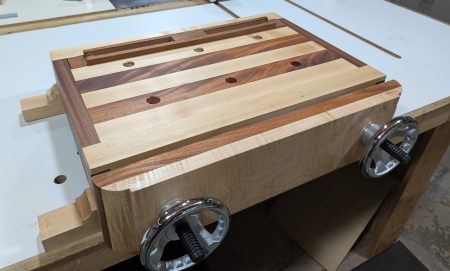
The design of this vise is relatively straightforward. I chose hard maple, purchased from, of course, Parkerville. With maple being somewhat bland, I chose mahogany as a contrasting wood for the top and for the sides. The side rails are dovetailed into the front and back “legs.” I included the addition of a Roubo-style “tool tray” that can be rotated 180° and used as a planing stop. For the front face, I found some beautifully quilted maple. The main top sits between the two side rails and is supported by cleats on the underside that allows for the top to expand during the humid months.
The vise features four (4) feet that provide additional stability and, if needed, can be used to clamp the vise to the bench. However, the vise is pretty substantial, weighing in around 25 pounds. I added self-adhesive 1/8″ thick rubber strips along the entire bottom length of the front and back “legs” to help grip the top of my workbench. This works quite well.
To help with work holding and other needs, I included of six (6) 20mm dog holes with chamfered edges. Although the design below shows three (3) additional dog holes in the vise face, I decided to hold off on these. If I find they are needed, they will be easy to add later. I am using UJK self-expanding dogs, which fit snugly, but can be locked into place with a twist. When not in use, the dog holes are covered with UJK’s plastic caps, which prevent stuff from falling through the open holes.
Finally, I lined the inside of the front vise face with clubber. It’s a combination of cork and rubber. The entire piece was finished with two coats of Waterlox classic. I plan to let the vise-workbench acclimate for a month or so and then will check to see if I need to touch up the top with a jointer plan.
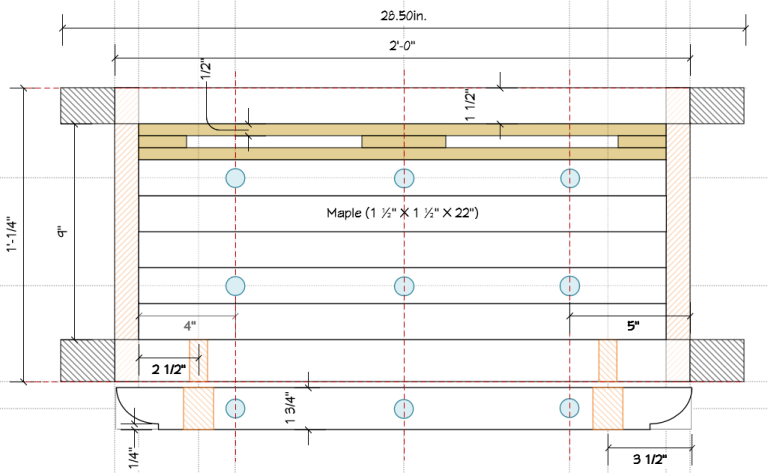
Here are the key measurements:
You can resize this design to meet your own needs. Please be aware that clamping effectiveness can become compromised the wider the distance between the two threaded rods.
If you have experience dimensioning and milling lumber for any type of furniture-making, you’ll find this project to be fairly easy – as long as you take your time. After rough cutting all the components, I milled the two rails, the vise’s face, and front and rear “legs” to their final dimensions, including the feet. The font face has a “beaded roundover” design element on each end, and the intersection of the feet to that main part of the leg have a convex beaded detail that you can see in the featured image.
I milled the individual top slats to their final dimensions, but kept the length several inches longer than needed in the design. The top will be sized to fit later. Once the individual slats were milled, they were oriented as to grain and visual appeal and numbered. Biscuit slots were cut in each and the top was glued up and set aside to cure. Later, it was run through a planer to ensure the top was flat.
Dovetails “tails” were cut into the side rails and the “pins” into the legs and fine-tuned. It’s critically important that you check that both the side rails and main supports are dimensionally true. Perform any adjustments as needed before you cut any dovetails. Take your time and be sure to give your chisels a quick honing before you begin.
Next, 3/4″ through holes were drilled through the front support and checked for fit. With the threaded rods inserted, a line was scribed around the six (6) sides of each nut, on the inside of the front support (that is, the inside vise face), then using a chisel, wood was removed to the scribe line to allow the nut to be countersunk below the surface. Pro Tip: I highly recommend that you take a piece of 1/4″ or 1/2″ MDF and make a template to ensure the accurate placement of the holes for the threaded rods on both vise faces. I didn’t take the time to make a template and misaligned one of the holes in the front vise face and had to make a second. Lesson learned.
With that done, I gave the side rails and front and back supports a thorough sanding to 100 grit and glued the rails to the supports. Be sure that you have some clamping cauls on hand for the dovetails. Before you tighten everything down, checking for squareness. Remember, you do not need a ton of clamping pressure, just enough for a bit of glue squeeze out. Set it aside to cure.
Cut, dimension and glue up the parts for the tool tray and set aside. Like the top, you want to make the length and width a little oversized so you can adjust it for a proper fit later on.
Once the side rails and support frame is out of the clamps, you can now cut the top to fit the opening. Using your table saw, trim one clean end of the top. Before you do, check that your saw blade is truly at 90°. Fit the top to the frame opening and scribe a line for the offcut. Cut the top to fit and mark what side of the top you want showing. It would not hurt to grab some scrap and cut it to length to double-check your cutting length for the top.
Next, measure out the placement for where you want the 20mm dig holes, according to your personal preferences. You want the holes to perpendicular to the vise face. Take great care in measuring these out. If you’re using a drill press, check that the 20mm Forster bit is 90° to the drill press table and that you have selected the proper bit speed. Making a drilling template may help, this way if you make a measurement error, you have not ruined the top. A template can also help ensure the correct alignment when you drill the holes. Once the holes are drilled, use a chamfering bit in your router to chamfer the edges of the holes. Perform a test cut to determine the proper bit setting.
Cut yourself three 3/4″ x 3/4″ pieces of maple, the length (front to back) of the inside of the side rail/support frame and one that is measured for the side to side length. This will be used as a cleat to secure the top to the frame on three sides. Drill three alternating holes (top and side) to be used to secure the cleat to the side rail and the top. Flip the frame over, bottom up on a dead flat surface (e.g., your table saw). Drop in the top and screw in the cleats to the sides and top. The part of the cleats that extend past the end of the top will be used to support the “tool tray.”
Flip the main workbench on its feet and, using a quality straightedge, check the top for trueness. You should only need some minor fine-tuning. If the top is not true (i.e., dead flat), then use your choice of jointer plane or electric sander to get it flat. This is very important because you want to know that your workbench has a reliably flat reference surface. Sand or otherwise prep the rest of the piece as you would before finishing any project. Before applying any finish, I would let everything sit for a few days in case there is any wood movement – adjust as needed. Size the tool tray to fit. You’re almost there!
If it’s your preference, now is the time to break the edges if you plan to use a block plane, otherwise be sure to break the edges a bit when sanding.
Give everything another quick sanding to 120 grit. You really don’t need to sand beyond 120 grit as that will inhibit finish absorption. Use whatever choice of finish you like the best. Don’t forget that you must apply finish to the entire piece, inside and out, to ensure equilibrium. I chose Waterlox Classic, simply because I love the look and find it easy to use. Another favorite is Gilboy’s Hard Wax Oil, but that doesn’t offer the subtle tint that I get from Waterlox. If needed, apply another light coat.
Before you button everything up, be sure to line the inside of the front vise face with your preferred liner.
At this point, feel free to start using the vise/workbench. In a month or so, check the top again to see if it’s still dead flat. Adjust as needed. If you need to recoat the top, please do so. Once the top is stable, I’d suggest you give the entire piece a coat of high quality wax. Rewax as often as you feel is needed based on how much you use it.
You can purchase Moxon Vise hardware from a number of retailers. In all honesty, they are all pretty much the same, save for fit and finish. The major difference is whether the wheel used to tighten the vise has an optional handle that makes it easy to quickly tighten it. Some vise sets come with springs that will help push the vise faces apart when you loosen them, so you don’t need to do this manually. You can add springs on your own later if you feel it is needed. I may do this myself.
Regarding the “tool tray,” the height of this workbench design is 5-1/2″ which is a little low given the length of most bench chisels. Live and learn. If you decide to add the 20mm dog holes, I’d suggest you look to TSO Products. They carry a complete line of extremely well engineered “dog” products.
I have no affiliation with Waterlox or TSO products.
Once you have completed this project, consider the following companion projects that allow you to take advantage of your new vise. You can find examples of these projects on YouTube,
Do you need help with a woodworking or wood-related project and don’t know where to turn? We’re here to help. Whether you’re looking for consultation and advice, want help with design options or you’re simply looking for the right selection of wood for your project, we’re more than happy to assist you. Need help when it comes to milling or other services? We can assist you with that as well.


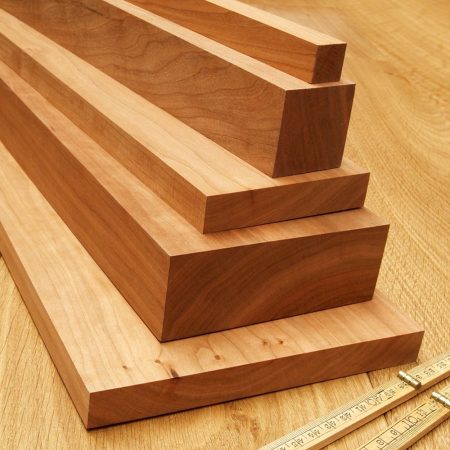
In celebration of President’s Day, our selection of 4/4 Cherry is on sale! Regular 4/4 Cherry is discounted to $3.99 bf with 8+” wide at $4.49.
Sale runs until February 24th!
** We’re open until 7 PM on Thursdays **